Deformation
Last week I got my terrain to the point where I could take an image and draw it into the terrain before drawing the terrain to the screen. This meant that I could see a ground texture but not much else. The next step is to make my terrain deformable.
The Theory
As I mentioned last week, the general idea for deformation is to use a blendstate to set the alpha value of certain pixels in the render target to 0. This will effectively ‘Dig’ holes into the terrain.
I also need to make this process simple to do so that it can be user friendly for my teammates when they design weapons later.
The solution I found to this is quite neat. You have some function that makes a brush (takes an image) which then adds the brush to a queue. The reason we do this is because although we want our deformation to be called anywhere, we want to map the Terrain as little as possible as moving the terrain onto the CPU and back constantly is not very efficient. We also can only draw into the render target in the Render function. By adding the brushes we wish to apply to a queue we can wait until the next Render call is made and then work through the queue appling each brush once, and then removing it from the queue so we don’t apply it constantly.
This method is quite nice as it means lots of freedom is given to the people designing weapon explosions as adding deformation is a single line of code.
The Implementation
So first let’s look at the function to add deformation to the terrain:
void Terrain2D::addDeformationToTerrain(std::string _deformationFileName, ID3D11Device* _Device, Vector2 _pos)
{
    string fullfilename = "../Images/" + _deformationFileName + ".dds";
    ImageGO2D* deformation_texture = new ImageGO2D(_deformationFileName, _Device);
    deformation_texture->SetPos(_pos);
    deformation_data.push(deformation_texture);
}
We utilize the image game object 2D class which will handle some of the image construction things for us, we then set the image position where we want our brush to be applied and then we add it to our deformation data queue.
We also want a way to clear that queue out so I wrote a simple release function for it:
void Terrain2D::releaseDeformationQue()
{
    while (!deformation_data.empty())
    {
        ImageGO2D* element = deformation_data.front();
        if (element)
        {
            delete element;
            element = nullptr;
        }
        deformation_data.pop();
    }
}
This just goes through each element of the queue and deletes it.
In the render function we grab the deformation data queue and check if it’s empty, if it’s not then we know we have something to draw. Here is the code I wrote for handling the queue data:
std::queue<ImageGO2D*> tdd_queue = m_terrainData->getDeformationData();

if (!tdd_queue.empty())
{

	m_terrain->Begin(m_d3dContext.Get());

	m_d3dContext->OMSetBlendState(m_terrain->GetDigBlend(), 0, 0xffffff);
	m_DD2D->m_Sprites->Begin(DirectX::SpriteSortMode_Deferred, m_terrain->GetDigBlend());


	while (!tdd_queue.empty())
	{
		ImageGO2D* tdd_texture = tdd_queue.front();

		if (m_terrainData->getPixelPerfectDeformationMode()) //Consider called swaping getPixelPerfectDeformationMode for perfect pixel accuracy.
			tdd_texture->TerrainDrawTest(m_DD2D);
		else
			tdd_texture->Draw(m_DD2D);


		if (m_terrainData->showDebug()) { std::cout << "[Terrain] Drawn object using dig blend at: "
			<< tdd_texture->GetPos().x << "," << tdd_texture->GetPos().y << " in " <<
			((m_terrainData->getPixelPerfectDeformationMode()) ? "Pixel perfect mode..." : "Camera mode...") << std::endl; }

		tdd_queue.pop();
	}

	m_terrainData->releaseDeformationQue();


	m_DD2D->m_Sprites->End();
	m_terrain->End(m_d3dContext.Get());

}
As you can see if the queue is not empty we map the Terrain onto the CPU like when we draw the terrain image into it initially but this time we setup a dig blend which is the configured blendstate that sets the alpha value of pixels to 0 and for every brush in the queue we get the brush and draw it onto the terrain with the dig blend. We use a debug message to tell us that we have done this and then pop the brush off the queue. After the queue is empty we call the release function to make sure that we don’t leave anything in it still. We then map the terrain back onto the GPU.
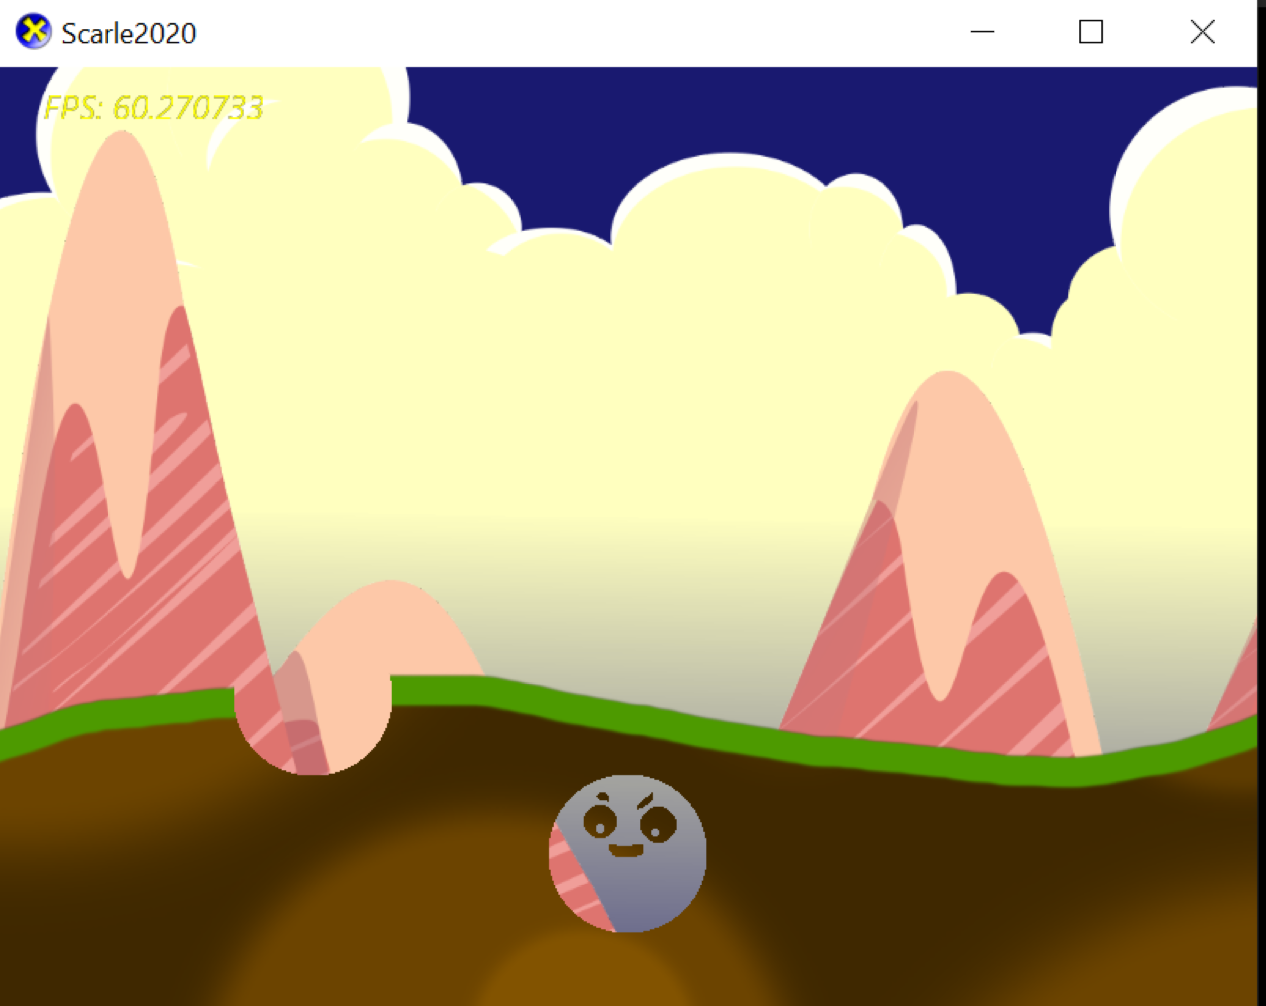
Here is an example of this system working:
We deform the terrain twice with this example so we need two lines of code:
m_terrainData->addDeformationToTerrain("CircleBrush", m_d3dDevice.Get(), Vector2(0, 250)); // terrain deformation tests!
m_terrainData->addDeformationToTerrain("CircleBrushOdd", m_d3dDevice.Get(), Vector2(200, 350));
This uses two different brushes, the circle brush will ‘dig’ out a circle while a ‘circle brush odd’ looks like this:

This means that the eyes, eyebrow and mouth will stay solid as the brush only cuts out things with an alpha value (The white pixels)
The terrain then ends up looking like this:

I think this works quite well!
Something else I have not mentioned is the way I draw the images into the render target now. I have currently got two methods of drawing, Pixel perfect mode and camera mode. This is because we now use a camera which can move around, so I thought it might break things if we keep the pixel perfect mode as a default mode as I’m not yet sure what the plan is when it comes to how people are getting the coords for where they want explosions to happen. All it does is add an offset and as the camera isn’t moving yet it makes almost no difference currently.